Computer upgrade (Slackware on Skylake)
I have finally managed upgrade my computer. During the upgrade process I faced some issues and decided to document the potential solutions here. This not a generic PC building guide but merely my build log.
Old machine specs
My current machine was using the following components:
- Q6600 CPU with overclock
- Waterblock on CPU
- Akasa AK-FN058 fans
- Gigabyte GA-EP45-DS3R motherboard
- 4GB of DDR2 RAM
- Crucial M500 240GB SSD on SATA2
- GTX 660 graphics
- Dual boot: Slackware+Windows 8.1
It worked well until I was using a 32-bit operating system but the amount of RAM turned out to be a bit unsufficent for my daily usage after switching to a 64-bit OS some time ago.
Daily usage
- Multiple browsers open with many tabs
- 1-2 VirtualBox machines open running Windows
- Working with ~10GB backup dumps
- Casual gaming
I need multiple browsers open for testing when I develop web applications. The Windows machines in VirtualBox provide me different IE versions. Windows virtual machine requires about 1-2GB RAM with an IE open. There was not much memory left for the host system with 2 or more virtual machines open.
The motherboard is using DDR2 memory with 4 sockets available which would require 2GB+ sticks for a considerable upgrade. Another issue is the lack of SATA3 interface which limits the speed of IO for the installed SSD. The lack of memory requires swap to be enabled on the SSD which causes (already has) high byte write count on it.
The Q6600 CPU is still ok for these tasks. Lots of people seem to be still running it, even for gaming computers. While there are socket 775 motherboards with DDR3 memory slots, getting one with SATA3 support is much harder. There are also other nice goodies that are not available on 775:
- USB 3.1 (fast system backups!)
- NVMe (even faster SSDs than with SATA!)
Considering this, it was high time to invest into a new platform.
New machine specs
After extensive online research, I settled with the following components:
- i5-6600K (Skylake) CPU
- Z170A GAMING M3 motherboard
- 16GB of RAM
- USB 3.1 support
- Samsung 950 PRO NVMe disk
- Budget of 700-800 EUR
- Lifetime 3-4 years
CPU
I picked the CPU based on the use case, flexibility and price:
- K-suffix version has open clock multiplier, meaning easy overclocking
- i5-6600K TDP is 91W versus i5-6600 TDP of 65W, tolerating overclocking better
- i5-6600 versus i5-6600K price difference is only 25-30 EUR
- i7-6700K versus i5-6600K price difference is over 100 EUR but i7 (2 threads per core) does not bring many benefits in my use case and was outside the budget.
- There are no K versions of i5-6500 and lower-tier CPUs.
The plan was to go with a motherboard based on the Z170 chipset. This chipset allows to freely choose the CPU clock speed multiplier (with K-suffic CPU) and also supports custom-speed RAM modules automatically with XMP.
Motherboard
There are lots of Z170-based motherboards available with every major motherboard manufacturer having about 10 models. I wanted LPT support for my printer and that turned out to be a limiting factor. I decided to go with an MSI motherboard, partly thanks to a good review on Phoronix. While not exactly the same board, the Z170A Gaming M3 supports LPT.
My other concern was a good VRM cooling. Watercooling puts larger thermal stress on the CPU voltage regulator as there is no strong airflow from the CPU cooler anymore. This is especially important when overclocking. The M3 board has heatsinks on the VRM mosfets.
Linux/Slackware support
Another concern was Linux support. The motherboard chipsets are generally well-supported but sometimes there are glitches with built-in ethernet or sound card. MSI provides no official Linux support but the Phoronix review suggested that things might work out.
The board comes with built-in Realtek ALC1150 Codec sound unit. It is supported by Linux but depends on kernel support. I use a custom kernel and I already had support for it enabled as my current motherboard was using a similar unit.
The board comes with built-in Killer (Atheros) E2400 Gigabit LAN controller. Googling gave me an impression that this works with the Qualcomm Atheros AR816x/AR817x (CONFIG_ALX) driver. Later it came out to be not enough and required manual patching. The driver works but kernel does not recognize the device ID. The patch makes kernel to recognize the device.
i5-6600K CPU comes with integrated HD530 graphics. It is partially supported by Linux and requires kernel 4.3.x or newer. I enabled support in
kernel but hit the wall with lack of support by Xorg. Slackware 14.1 Xorg is outdated (1.14) and its intel driver does not support it. Any attempt
to start X was met with an Unknown chipset error. My primary display uses Nvidia GTX 660 which works well with the new setup and I have
not tried to upgrade Xorg yet. I will probably not do it before Slackware 14.2 is released.
While setting things up, I used an Ubuntu 15.10 installation on an USB drive. It comes with X version 1.17 and worked well with the Intel graphics. However, it was not stable with the GTX 660 installed and reported EDID mismatch errors from the Nouveau driver. Slackware 14.1 with Nvidia driver has been completely stable so far.
The X version can be checked using the following command:
X -version
Slackware 14.2 is likely to use X 1.18+ and should support the integrated graphics too.
CPU waterblock
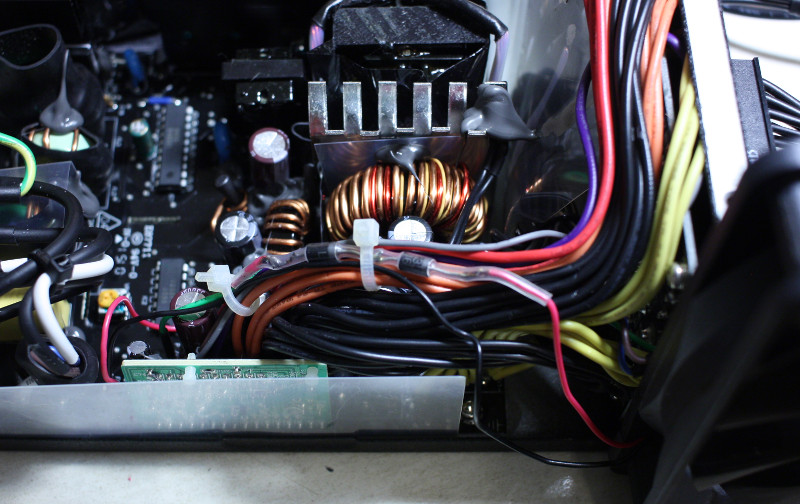
i5-6600K comes without a stock cooler. I kept using my old waterblock after ordering a socket 115x conversion kit and a matching backplate from Watercool.de. Socket 775 backplate and mounting brackets do not work: the cooler mounting hole spacing is 75mm on the 115x socket compared to the 72mm on 775. I had to take apart the block for installing the conversion kit. This is what the innards of the waterblock look after 4 years of usage:

The conversion kit came with a manual which lists useful information on the block mounting force. This is important on 1151 socket systems as these sockets tend to be more fragile than older ones. The manual states the total mounting force in relation to the spring compression length (Heatkiller uses long springs under the mounting screws).
NVMe disk
NVMe is an alternative way of attaching SSD disks to the system. It achieves about 2000MB/sec read speed versus 500MB/sec of traditional SATA-base SSD disks. It's not a new technology (Linux support came in 2012) but has not been very affordable until 2015 with the release of Samsung SM951 and some similar devices.
My original plan was to get SM951 but Samsung had released 950 PRO when I was ordering the components. 950 is based on the newer V-NAND technology and comes with a 5-year warranty. I often work with medium-sized backup dumps and virtual disks and fast IO is something I really like.
One potential issue I noticed was a very small screw for mounting the drive. In high-vibration conditions the screw might loosen and short out the graphics card in the PCIe socket below the drive.
Memory
The idea was to use as fast memory as possible that still fits the budget. 16GB is definitely enough for running 1-2 virtual machines and have swap disabled. Memory cost seems to depend mostly on amount, less on speed (bandwidth and latency). I chose Corsair Vengenance LPX 2x8GB kit, tested to run at 3200 speed. The speed is automatically set through the XMP profile during boot.
New PSU
I planned to keep my old PSU. It was a 450W Chieftec, modified with a silent Nexus fan. This PSU, while working perfectly with the old system, turned out to be a lot of headache. After putting the base components together (motherboard, cpu, ram and cooling) I was not able to boot the system. I spent 6 hours debugging it. Finally it came out that the PSU +5V standby output was only 3.6V! It was enough to boot the old Gigabyte board but on MSI it did nothing. It took lots of Googling to find potential issues (anything from BIOS issues to shorted out componets and misplaced CPU) but the bad standby was never mentioned. At the end, I decided to get a new PSU.
EVGA fan grille issues
I picked an EVGA SuperNOVA 650G1 which was available locally. It's fully modular (use only as many power cables as you need) and it has good reviews.
However, it has issues with noise. The PSU fan itself is silent but the airflow from it is not. The PSU uses an unique fan grille design and I discovered that it causes high-pitch "whoosh" sound. It was easy to fix: just remove the grille. The PSU is located inside the PC case anyway which protects the fan from getting mechanical damage. On the other hand, the plastic fan is too weak to cause injuries by having fingers getting caught in it.
I also lowered the noise further by lowering the fan voltage by about 1V. This was achieved by connecting two diodes (1N4001 or similar will work) in series with it:
My old supply had the same mod. Warning! This kind of modding voids the warranty. Even to remove the fan grille, the PSU has to be opened. After these mods the PSU fan cannot be heard anymore. The noise is dominated by (much less irritating) water pump sound.
Finalizing the build
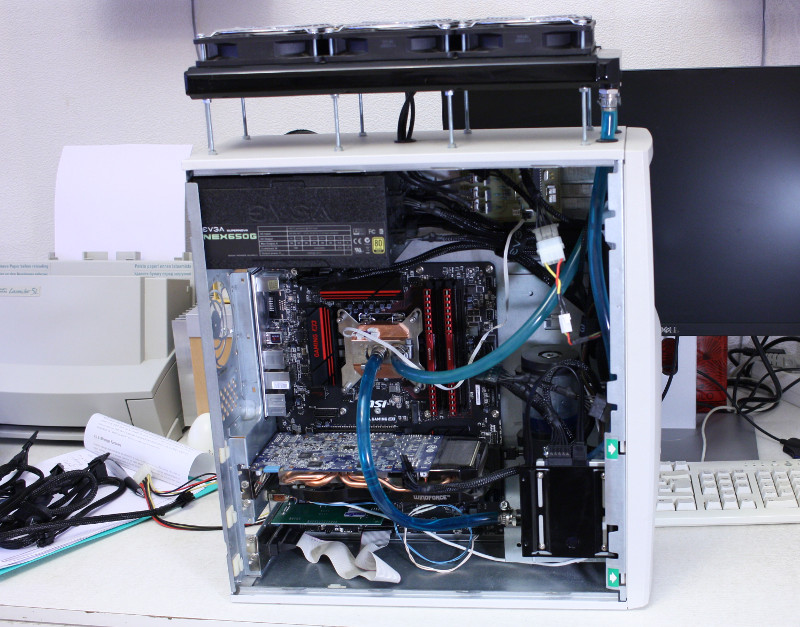
Everything worked on first try (besides PSU issues). This is what the final system looked after putting it all together:
Operating Systems transfer
After I got the hardware running I migrated my data to the new disk. This is much faster than just reinstalling everything.
The old disk configuration was the following:
- Single 240GB disk (Crucial)
- Partition 1: Windows 8 reserved (350M)
- Partition 2: Windows 8 normal (80G)
- Partition 3: Linux SWAP (4G)
- Partition 4: Linux / (remining)
I wanted to turn it into this:
- Slackware on 950
- Windows on Crucial
without losing any data or reinstalling anything. The partioning scheme for the 950 would be:
- Partition 1: Reserved (350M)
- Partition 2: Linux / (remaining)
and for the Crucial:
- Partition 1: Windows 8 reserved (350M)
- Partition 2: Windows 8 normal (remaining)
The reason for leaving a reserved partition on the 950 disk is preparation for possible upgrade to UEFI. It would then be used as an UEFI system partition. I thought about using UEFI initially but MSI firmware has no issues with disks using non-GPT partition table (good old DOS partition table). There is a very good introduction of what UEFI is and what it is not. Currently I see not see a reason why I should use GPT and a pure UEFI setup.
Cloning
I cloned everything on Crucial to 950. I did this using the low-level dd command. dd is also known as "data
destruction" command and has to be used very carefully. Cloning the disk gave extra safety against accidental commands. I also had a full disk
image on NAS and offsite backup in case that everything goes wrong.
Cloning won't make the system boot (at least the Linux installation) on the new disk. This is because the root device is wrong for the kernel. The root block device has a different device file.
After cloning, a system reboot has to be done in order to make sure that new partition tables are used by the kernel. For a few steps more the system had to be boot using the old disk. I used the MSI boot device selector (F11 during boot) to select the correct disk.
New block devices
Unlike SATA-attached devices, an m.2-attached disk won't show up as /dev/sdX. It uses a different naming scheme:
/dev/nvme0n1for first disk/dev/nvme0n1p1for first disk's first partition/dev/nvme0n1p2for first disk's second partition- etc.
The list of block devices attached to the system can be optained using the lsblk command. Example output (after transferring the
system):
NAME        MAJ:MIN RM   SIZE RO TYPE MOUNTPOINT
sda           8:0    0 223.6G  0 disk
├─sda1        8:1    0   350M  0 part
└─sda2        8:2    0 223.2G  0 part
nvme0n1     259:0    0 238.5G  0 disk
├─nvme0n1p1 259:1    0   350M  0 part
└─nvme0n1p2 259:2    0 238.1G  0 part /
Disk ID conflicts
Low-level cloning gave the new disk a duplicate ID. All partitions and filesystems got duplicate UUIDs too. The Lilo bootloader does not like
duplicate IDs and will tell you that on boot. It still boots while emitting an error message. I was able to fix the duplicate disk ID using the
fdisk command. The functionality to change the disk ID is under the expert menu. Example:
# fdisk /dev/nvme0n1
Welcome to fdisk (util-linux 2.21.2).

Changes will remain in memory only, until you decide to write them.
Be careful before using the write command.

Command (m for help): x

Expert command (m for help): i
New disk identifier (current 0x92b8b62e):
The new ID must be specified in the same format. I modified the existing one by increasing a digit.
Filesystem UUID conflicts
Cloning also causes filesystem UUID conflicts. The list of filesystem UUIDs can be retrieved using the blkid command. Example output
(after transferring the system):
# blkid
/dev/nvme0n1p1: LABEL="System Reserved" UUID="386A9FCC6A9F8572" TYPE="ntfs"
/dev/nvme0n1p2: UUID="9c61a1ae-e331-4356-86d1-fd289d9ff79d" TYPE="ext4"
/dev/sda1: LABEL="System Reserved" UUID="386A9FCC6A9F8572" TYPE="ntfs"
/dev/sda2: UUID="B62EA2682EA220FB" TYPE="ntfs"
I found these conflicts to cause no issues but they might confuse some backup and disk tools. The filesystem UUID can be changed with a command like:
tune2fs /dev/nvme0n1p2 -U 9c61a1ae-e331-4356-86d1-fd289d9ff79d
for ext2/3/4-based systems. New UUIDs can be generated using the uuidgen command.
I have not yet found a way to change NTFS partition UUIDs.
Resizing on 950
To obtain the target partition scheme on the 950 disk, the Windows and the Linux Swap partitions had to go and the Linux root partition had to be
moved to the start of the old Windows partition. I did all disk operations using fdisk and dd. These operations were:
- Deleting Windows partition
- Deleting Swap partition
- Copying Linux partition to NAS
- Deleting Linux partition
- Creating new Linux partition
- Copying data back from NAS
- Resizing the filesystem
There are some tools like gparted that are supposed to help with moving partition data. They might be helpful on larger disks but in this case I did not want to take risk since there was an overlapping region between the old and the new partion data and I was not exactly sure how these tools handle it.
The ext2/3/4 filesystem can be automatically resized to the underlying partiton size using the command:
resize2fs /dev/nvme0n1p2
All of this was executed with the system booted from the old disk.
Making 950 bootable
The next step, making the new disk bootable, proved to be challenging. Firstly, I made kernel on the old disk bootable with the root filesystem on
the new disk. This was easy by adding a new boot entry to the Lilo conf (/etc/lilo.conf). The entry looks like this:
image = /boot/vmlinuz-4.3.3
root = /dev/nvme0n1p2
label = Linux-4.3.3nv
read-only
The file /boot/vmlinuz-4.3.3 is my custom kernel and /dev/nvme0n1p2 is the root partition device file of the new disk.
Running lilo writes this information into the bootloader on the old disk MBR. So far everything was good.
After booting with this entry I went to update the MBR on the new disk too. The Lilo conf needs this entry and also an update to the
boot parameter which indicates the device with the correct MBR sector. For my case, this is /dev/nvme0n1. Unfortunately,
when trying to update the MBR, I hit the wall with this error message:
WARNING: SATA partition in the high region (>15):
LILO needs the kernel in one of the first 15 SATA partitions. If
you need support for kernel in SATA partitions of the high region
than try grub2 for this purpose!
Fatal: Sorry, cannot handle device 0x10300
There is only one forum thread found on Google with the reference to the same error message. Their issue is about a RAID configuration and leads to nowhere considering this.
Later I dug out the answer from Lilo and kernel NVMe driver sources. Kernel assigns nvme block device major number 259 which is also used for block devices of "high partitions". A partition number greater than 15 is considered high. Lilo refuses to work with such disks and is therefore incompatible with this setup.
Grub is not a solution
I tried to use grub. It was installed on Slackware by default. Running grub-mkconfig creates some super-complex conf file. I had
absolutely no idea what I was seeing. After updating the MBR with grub-install I tried to boot from the new disk but grub kept
complaining about missing disks.
Googling revealed that Grub and NVMe disk combination seems to be a mess (not really supported? hardcoded /dev/sdX references?):
- grub-installer: NVMe boot drives not supported
- grub-common: Add support for NVMe devices in grub-mkdevicemap
- Booting from NVMe Device Enters GRUB rescue
- etc...
Syslinux works
Syslinux is another bootloader. I decided to try it after Lilo and Grub. It comes with a set of pre-made MBR binaries and utilities. For setting up a boot with kernel from ext4 filesystem, the extlinux command is used. It relies on the "bootable" flag of partitions and installs specific boot code at the beginning of the partition.
The biggest issue with Syslinux was figuring out where should the configuration file go. The manual lists multiple locations. I finally settled for
/boot/extlinux.conf. The file contains boot options and is similar to Lilo configuration file. I configured my system with the
following file:
DEFAULT linux
  SAY Now booting the kernel from SYSLINUX
  LABEL linux
  KERNEL vmlinuz-4.3.3
  APPEND ro root=/dev/nvme0n1p2
Running the command
extlinux --install /boot
will modify the boot sector of the partition that contains the /boot directory.
I installed the generic MBR code with the command:
dd bs=440 count=1 conv=notrunc if=/usr/share/syslinux/mbr.bin of=/dev/nvme0n1
The system booted on the new disk on first try and I plan to keep on using Syslinux for some time. There is also Syslinux MBR code for GPT disks. One day I might switch to UEFI boot by using kernel's built-in EFISTUB support. This would remove the need for a boot loader completely. UEFI boot works only with GPT partition tables (easy to convert without moving data) but requires the root filesystem partition GUID hardcoded into the kernel.
As my Windows installation is on another disk now, I opted for using the MSI boot device selector for choosing between Linux and Windows during boot and configured Linux disk to be booted by default. This also works with MSI Fast Boot enabled (F11 has to be pressed very early in the boot sequence).
Resizing Windows partition
Working with the Windows partition was easier as the partition did not change location. It just had to be resized by first removing Linux Swap and Linux root partitions and then extending the Windows partition to cover the remaining disk. I did these operations using the Windows 8.1 own Disk Management utility.
Since there was no Linux on this disk anymore, I switched back to Windows own boot loader in MBR. This was done with the Windows install CD/DVD through the rescue console and it completed the system migration.
Final thoughts
So far I have been using the upgraded computer for a week. Everything works and is very stable. I have further plans to replace the water pump for something less noisy. The case fan (non-Akasa) on the side of the computer is noisy as well and also needs a replacement.